Bye, bye, Blogger! SGCC has moved!

You should be automatically redirected in 5 seconds. If it does not redirect, please visit
http://stickygooeycreamychewy.com
and remember to update your bookmarks.

Tuesday, March 31, 2009

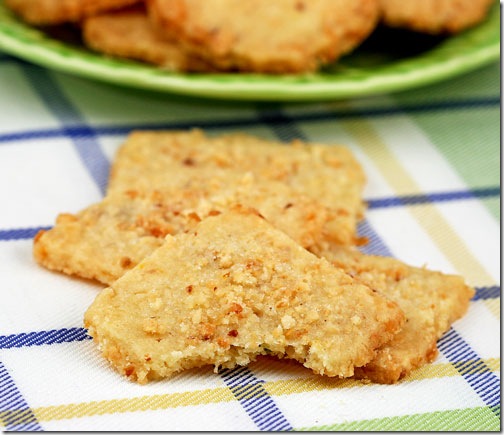
TWD: Coconut Butter Thins

coconut-thins3

Working your way through an entire cookbook, recipe by recipe can be a tricky business. Especially, when someone else is choosing the recipes for you! Sometimes, you're delighted by what you end up with - and sometimes, not. While Dorie's Coconut Butter Thins do contain several ingredients that I love - butter, coconut, lime, macadamia nuts and ground coriander - I didn't really love them in this cookie. Don't get me wrong, I LIKED the cookies. I just didn't LOVE them.

Coconut Butter Thins are supposed to be thin, crispy and lacy shortbread-like cookies. And mine were. But to me, the flavors were so subtle that they were virtually undetectable. I got no sunny pop of lime or scent of coriander. Nor did I find much crunch of macadamia nuts. I did get some chewiness from the coconut, but mostly in the annoying shreds that peeked out from my neatly cut cookie shapes. They were a nice little unassuming cookie that would probably be great paired with something else, but without much personality of their own.

coconut-thins1

I also think that there's a reason that there is no accompanying photo of these cookies in the book. My cookies were just not very photogenic. When baked, they flattened out and spread a bit so that their edges blurred. I made one sheet of cookies cut into squares as Dorie directs in the recipe. Once out of the oven, they took on a kind of stretchy, Dali-esque quality. I cut the next batch into rounds which held their shape better, but not much. To be fair, I do think that I rolled my cookies a little too thin. I don't know how much that affected the shape, if at all.

I'm sorry, Dorie! You know I love you. But, these just didn't do it for me the way so many of your other fantastic recipes have.

coconut-thins2

Thanks to Jayne from The Barefoot Kitchen Witch for choosing our recipe for this week. If you'd like to see how the rest of the TWD gang fared with these Coconut Butter Thins, check out the Tuesdays with Dorie blogroll.

Monday, March 30, 2009

Dinner and a Movie: Moonstruck Roundup

moonstruck

Moonstruck is a delightful and endearing romantic comedy about love and life set in New York City's Italian-American community. In it, Loretta Castorini, (brilliantly played by Cher), an unlucky in love Italian widow (her first husband was hit by a bus) finds romance through the intervention of la bella luna. With her second wedding to stodgy mama's boy, Johnny Cammareri, just weeks away, she meets and reluctantly falls hopelessly in love with her fiance's estranged younger brother, Ronny! Her dilemma and her hilariously eccentric family make for an unforgettably enchanting and irresistible movie experience.

moonstruck

I chose Moonstruck for this month's Dinner and a Movie, first and foremost, because I love it. I love it not only for its abundant humor, warmth and charm, but also because of its rich ethnic flavor and pervasive theme that love and family are the most important things in life and are meant to be celebrated with gusto! And, there is a helluva lot of gusto going on in that movie!

moonstruck_4

As an Italian-American from the Bronx, watching Moonstruck is an emotional experience for me. I can really identify with it. In fact, several of the characters could have come straight out of my own family album! Each time I watch it, a comforting wave of familiarity and understanding washes over me. In the final scene, where the music swells and the camera pans to all of the old family photos, I always spill a few tears.

moonstruck_57

Another reason that I love this movie is for its beautiful music, much of which is taken from Puccini's glorious opera, La Boheme. According to both Norman Jewison and John Patrick Shanley, the director and screenwriter of the film, Moonstruck was always intended to have an operatic feel from its conception. Jewison specifically envisioned La Boheme because he felt that its music was the perfect vehicle to enhance the various dramatic, comedic and romantic elements of the film. It worked. Imagine Moonstruck without Puccini's music. It just wouldn't be the same!

Remember this scene? It's the one where Ronny takes Loretta to the opera for the first time to see La Boheme at The Met. Loretta is moved to tears as the singers perform the beautiful duet, Donde Lieta Usci. I think it is one of the most compelling in the whole movie.

Italian opera was the inspiration for my dish, Pasta alla Norma. Pasta alla Norma is a divine concoction of eggplant, onions, tomatoes, basil and ricotta salata, a semi-hard salted ricotta cheese, served over pasta. Legend has it that this classic Sicilian dish was named for Vincenzo Bellini's popular bel canto opera, Norma, which premiered in 1831 at La Scala.

pasta-norma1

The most famous and memorable Norma of all time was Maria Callas, with eighty-nine stage performances of the opera under her belt. If you look closely at my photos, you can see a picture of La Divina, herself, as Norma in a 1950 production at La Fenice in Venice.

There are many variations of Pasta alla Norma, but the essentials of the dish are pretty much the same. The traditional preparation is with fried eggplant, although I've seen recipes where the eggplant is roasted. I made the fried version because it is more authentic and.....what the hell? How often do I fry eggplant?

pasta-norma3

Pasta alla Norma
(Printable Recipe)

Ingredients:

2 large globe eggplants, diced into 1-inch cubes
1/2 cup plus 2 tablespoons olive oil
1 medium onion, small dice
4-6 garlic cloves, sliced
1 teaspoon-1tablespoon hot chili flakes, according to taste
One 28-ounce can Italian plum tomatoes, crushed
2 sprigs fresh basil
Salt and pepper to taste
1 pound pasta of your choice (I used rigatoni)
6-8 ounces ricotta salata, crumbled or thickly grated
Handful of fresh basil leaves, torn or sliced for garnish

Directions:

Place the diced eggplant in a large colander with a plate underneath it and sprinkle with a generous amount of salt. Place another plate on top of the eggplant and let stand for 30-45 minutes. Remove the eggplant and dry thoroughly with a paper towel.

Heat 2 tablespoons olive oil in a medium saucepan over medium heat. Add onions and saute until soft and translucent, about 7-8 minutes. Add the garlic and chili flakes for the last minute or two until fragrant.

Add the tomatoes and basil sprigs to the saucepan. Bring to a healthy simmer, lower heat to medium-low and simmer covered for 20 minutes. Uncover and continue to simmer for about 15-20 minutes more, or until sauce thickens. Add salt and pepper if needed.

While sauce is simmering, cook the pasta and the eggplant. Bring a large pot of water to a boil and cook the pasta until al dente.

In a large skillet heat, the 1/2 cup olive oil over medium high heat until almost smoking. Add the eggplant in batches and fry until golden brown, about 5-8 minutes. Remove to a plate lined with paper towels. Set aside.

To serve, toss the pasta with the tomato sauce. Top with the eggplant. Sprinkle the ricotta salata over the top and garnish with the sliced basil.

Enjoy!

And, now for the Roundup:

popcornxSML

Maryann from Finding La Dolce Vita believes that an Italian movie needs Italian Popcorn! So, she sent over this "Italianized" version. Popped in olive oil and tossed with Italian herbs, spices and Parmesan cheese, this looks like the perfect tasty snack to curl up on the couch with! Thanks, Maryann!

pasta&ceci

Lola from Aglio, Olio & Peperoncino sent over her Mamma’s Pasta e Ceci. Lola says "This dish is a family legacy, and since most of the comedy’s dialogue scenes take place with the family gathered around the kitchen table, and Grandpa dispensing wisdom and humor with each bite, I wished to honor that homey Italian family tradition by contributing with my mother’s famed Pasta e Ceci soup."

Thank you Lola! We're honored that you've shared a treasured family recipe with us!

focaccia_small

This delicious looking Peppers and Cheese Focaccia comes from Andreas of Delta Kitchen. Andreas says that his dish was inspired by the Italian bakery in the movie. Don't you just love those vibrant colors? Thanks, Andreas!

Moonegg

Holly from Food and Entertaining - Holly Hadsell - El Hajji calls her dish Moonegg. She loves all the food scenes in Moonstruck and it was hard for her to make one choice. She decided on this egg dish because it was the first time she had seen anything like it. Great choice, Holly. It looks mighty tasty! Thanks for sending it over!

pasta_fazool-4

My incredibly talented and creative co-host, Marc from No Recipes contributed his take on "Pasta Fazool". Marc's inspiration for his dish was the opening song in the movie. He says, "The movie opens to the song That's Amore which mentions Pasta Fazool in one of it's verses. Watching the movie, it's a dish I could totally
see showing up on the Castorini's dinner table."

You're so right, Marc. Your Pasta Fazool, itsa maka me drool! Thank for sharing this with us!

image

These luscious Italian Wedding Cupcakes came from Lisa of My Own Sweet Thyme. Lisa says that like the movie itself, these Italian Wedding Cupcakes have a dark sweetness, tempered by a tart glow and a nutty texture that is Oh, So Good! I completely agree, Lisa. They look amazing! Thanks!

Steak-diane-Zabeena

Zabeena from A Lot on My Plate sent over not one, but TWO great dishes! The first, Steak Diane, was actually inspired by that big, beautiful full moon. Zabeena says that the effect of a full moon plays an important role in the film - "she brings the woman to the man" - she referring to Roman Moon goddess Luna. Another moon goddess is Diana, hence Steak Diane. A steak was, of course, also particularly fitting because it is what Loretta cooks for Ronny in the film when they first meet. (I love the way that girl thinks!)

Ciabatta-eggs-Zabeena

Zabeena's other dish, Ciabatta Breakfast Starter, was inspired by the kitchen scene where Rose cooks Loretta up some eggs in the hole for breakfast.

Both Dishes look fabulous! Thanks, Zabeena!

Shrimp-Pasta-Valli

"Moonstruck is not exactly a film about food... it's mostly about love, family and starting over again. But because Nicolas Cage plays a one-handed baker named Ronnie Cammareri and there are subsequently many scenes of his bakery, I think Moonstruck still counts as a food movie." explains Bellini Valli from More Than Burnt Toast. So, in honor of the movie and the baker, she has sent over her Pasta Shells with Shrimp and Garlicky Bread Crumbs - a Parmesan and a lemon anchovy pasta salad with shrimp. Sounds absolutely divine, Val. Thanks for sharing it with us!

Pat from Mille Fiori Favorati was born and bred in Brooklyn, not far from Brooklyn Heights and Carroll Gardens, where much of Moonstruck was filmed. She feels that the movie portrays a true slice of Brooklyn life.

Baccala-Florentine-MilleFiori

Pat says, "Because I think Moonstruck's Johnny Cammareri was a "baccala" --which is also known as an Italian slang word for a less than smart person -- for letting Loretta's love slip from his life in the movie to his brother Ronny, I prepared my version of "Baccala Florentine" as my dinner recipe."

I hope that you've enjoyed this month's installment of Dinner and a Movie. I've certainly had a great time putting it together for you. Stay tuned for details about next month's movie. Marc gets to choose, and I'm sure it will be another great one!

By the way, I also wanted to mention that some of these great screenshots came from Echte Tunus of Movie Screenshots. You should check out his site. He does really nice work!

Friday, March 27, 2009

Daring Bakers, Italian-Style: Lasagne Verdi al Forno (and Moonstruck Reminder)

lasagne4

Buon giorno, amici! It's Daring Bakers time again, and this month my colleagues and I are channeling our inner Italian Nonnas. We've replaced our vanilla beans with spinach, our buttercream with béchamel and our ganache with ragu. We've made lasagne, and lots of it, from scratch - including the pasta. It's challenges like this one that put the "daring" in Daring Bakers!

The March 2009 challenge is hosted by Mary of Beans and Caviar, Melinda of Melbourne Larder and Enza of Io Da Grande. They have chosen Lasagne of Emilia-Romagna from The Splendid Table by Lynne Rossetto Kasper as the challenge.

lasagne2

Lasagne is one of those dishes that lends itself to many different interpretations. Even within Italy, it varies from region to region, usually based upon ingredients commonly found in each. In the southern part of the country, lasagne would most likely include a tomato-based sauce, ricotta cheese and fresh mozzarella. The classic lasagne of Emilia-Romagna uses only Parmigiano Reggiano cheese, a meat-based Bolognese sauce and nutmeg flavored béchamel sauce. It should also be made with pasta verdi, or green pasta sheets, which is egg pasta with added spinach.

I have to say that I was really excited when I learned about this challenge. My dog-eared copy of The Splendid Table is one of my favorite cookbooks. I've actually even made this lasagne before, although I must confess that I bought my pasta verdi from my local Italian market. I do own a pasta maker, but it's a real pain to use. It is the old-fashioned kind that you have screw onto the counter and crank by hand. My counter tops have rounded edges and the darn thing is always falling off.

After a few minutes of fretting about how I was going to get that pasta made, I had a light bulb moment.

lasagne6

My mother has one of these fancy schmancy electric pasta machines! Isn't it pretty? Hmmm. I thought I'd just give her a call and ask if she like to make some lasagne with me. And, guess what? She did. Problem solved!

So, last Sunday I shopped for our ingredients, loaded up the car with all of my props, camera gear and assorted other stuff and drove the four blocks over to Mom's. Yes, I said four blocks. What? You didn't think I was going to haul all of that crap over there on my bicycle, did you?

As I was heading out, I got a call from my best girlfriend, Susan. She wanted to know if I could photograph something for her, so I told her to meet me at Mom's and she could help us make some lasagne. While Susan was on her way over, she got a call from our other best girlfriend, Amanda. Before I could say Bolognese, Amanda was on her way over to help too!

The girls showed up with lots of enthusiasm and bottles of champagne. They are fabulousness personified! We laughed, we toasted (not Mom), we gossiped, we took lots of pictures and we made some killer lasagne! From start to finish, the whole process took about eight hours! The time kind of flew by, though, because we were really enjoying ourselves. In fact, we had so much fun, we've decided to make it a monthly event. So, each month, we'll pick a recipe, meet at someone's house and cook, drink and eat! Hopefully, I'll be able to share it all with you here.

Here are Mom's hands, chopping up the spinach for the pasta verdi. (She's a little camera shy. It must run in the family.)

lasagne7

Here's Amanda and me rolling out the pasta sheets.

lasagne8b lasagne8a

I look a little blurry because Susan took the shot with a champagne glass in one hand and her cell phone in the other. Did I mention she is a high-powered business woman?

lasagne11

Aren't our pasta sheets the prettiest color green? I was so thrilled at how perfect they turned out! And, check out this gorgeous, rich and meaty ragu!

lasagne10a lasagne10b

Here's Mom pretending to be "The Flash". She kept moving around so much, that I couldn't get a decent shot of her. (I told you she was camera shy. Or maybe I had one too many glasses of champagne.)

lasagne12

While our lasagne was baking, we turned the leftover pasta sheets into tagliatelle. Now, doesn't THAT look good?

tagliatelli1

Aaah! Just look at that magnificent hunk of lasagne in all its oozey glory! Let me tell you, it was as wonderful as it looks!

lasagne5

Even the Little Guy wanted in.

Philson2

Many thanks to Mary, Melinda and Enza for choosing such a terrific recipe for us this month! It wasn't the typical DB challenge, but it was a great change of pace. If you'd like to see a bazillion more lasagne dishes, head on over to the Daring Bakers Blogroll. Then, check out our brand new gorgeous web site: http://thedaringkitchen.com/. (You might even find a little something about moi there.)

Lasagne of Emilia-Romagna (Lasagne Verdi al Forno)
(Serves 8 to 10 as a first course, 6 to 8 as a main dish)

Preparation Time: 15 minutes to assemble and 40 minutes cooking time

10 quarts (9 litres) salted water
1 recipe Spinach Pasta cut for lasagna (recipe follows)#1
1 recipe Bechamel Sauce (recipe follows)#2
1 recipe Country Style Ragu (recipe follows)#3
1 cup (4 ounces/125g) freshly grated Parmigiano-Reggiano

Method
Working Ahead:
The ragu and the béchamel sauce can be made up to three days ahead. The ragu can also be frozen for up to one month. The pasta can be rolled out, cut and dried up to 24 hours before cooking. The assembled lasagne can wait at room temperature (20 degrees Celsius/68 degrees Fahrenheit) about 1 hour before baking. Do not refrigerate it before baking, as the topping of béchamel and cheese will overcook by the time the center is hot.

Assembling the Ingredients:
Have all the sauces, rewarmed gently over a medium heat, and the pasta at hand. Have a large perforated skimmer and a large bowl of cold water next to the stove. Spread a double thickness of paper towels over a large counter space. Preheat the oven to 350 degrees Fahrenheit (180 degrees Celsius). Oil or butter a 3 quart (approx 3 litre) shallow baking dish.

Cooking the Pasta:
Bring the salted water to a boil. Drop about four pieces of pasta in the water at a time. Cook about 2 minutes. If you are using dried pasta, cook about 4 minutes, taste, and cook longer if necessary. The pasta will continue cooking during baking, so make sure it is only barely tender. Lift the lasagne from the water with a skimmer, drain, and then slip into the bowl of cold water to stop cooking. When cool, lift out and dry on the paper towels. Repeat until all the pasta is cooked.

Assembling the Lasagne:
Spread a thin layer of béchamel over the bottom of the baking dish. Arrange a layer of about four overlapping sheets of pasta over the béchamel. Spread a thin layer of béchamel (about 3 or 4 spoonfuls) over the pasta, and then an equally thin layer of the ragu. Sprinkle with about 1&1/2 tablespoons of the béchamel and about 1/3 cup of the cheese. Repeat the layers until all ingredients are used, finishing with béchamel sauce and topping with a generous dusting of cheese.

Baking and Serving the Lasagne:
Cover the baking dish lightly with foil, taking care not to let it touch the top of the lasagne. Bake 40 minutes, or until almost heated through. Remove the foil and bake another 10 minutes, or until hot in the center (test by inserting a knife – if it comes out very warm, the dish is ready). Take care not to brown the cheese topping. It should be melted, creamy looking and barely tinged with a little gold. Turn off the oven, leave the door ajar and let the lasagne rest for about 10 minutes. Then serve. This is not a solid lasagne, but a moist one that slips a bit when it is cut and served.

#1 Spinach Egg Pasta (Pasta Verde)

Preparation: 45 minutes

Makes enough for 6 to 8 first course servings or 4 to 6 main course servings, equivalent to 1 pound (450g) dried boxed pasta.

2 jumbo eggs (2 ounces/60g or more)
10 ounces (300g) fresh spinach, rinsed dry, and finely chopped; or 6 ounces (170g) frozen chopped spinach, defrosted and squeezed dry
3&1/2 cups (14 ounces/400g) all purpose unbleached (plain) flour (organic stone ground preferred)

Working by Hand:

Equipment

A roomy work surface, 24 to 30 inches deep by 30 to 36 inches (60cm to 77cm deep by 60cm to 92cm). Any smooth surface will do, but marble cools dough slightly, making it less flexible than desired.

A pastry scraper and a small wooden spoon for blending the dough.

A wooden dowel-style rolling pin. In Italy, pasta makers use one about 35 inches long and 2 inches thick (89cm long and 5cm thick). The shorter American-style pin with handles at either end can be used, but the longer it is, the easier it is to roll the pasta.
Note: although it is not traditional, Enza has successfully made pasta with a marble rolling pin, and this can be substituted for the wooden pin, if you have one.

Plastic wrap to wrap the resting dough and to cover rolled-out pasta waiting to be filled. It protects the pasta from drying out too quickly.

A sharp chef’s knife for cutting pasta sheets.

Cloth-covered chair backs, broom handles, or specially designed pasta racks found in cookware shops for draping the pasta.

Mixing the dough:
Mound the flour in the center of your work surface and make a well in the middle. Add the eggs and spinach. Use a wooden spoon to beat together the eggs and spinach. Then gradually start incorporating shallow scrapings of flour from the sides of the well into the liquid. As you work more and more flour into the liquid, the well’s sides may collapse. Use a pastry scraper to keep the liquids from running off and to incorporate the last bits of flour into the dough. Don’t worry if it looks like a hopelessly rough and messy lump.

Kneading:
With the aid of the scraper to scoop up unruly pieces, start kneading the dough. Once it becomes a cohesive mass, use the scraper to remove any bits of hard flour on the work surface – these will make the dough lumpy. Knead the dough for about 3 minutes. Its consistency should be elastic and a little sticky. If it is too sticky to move easily, knead in a few more tablespoons of flour. Continue kneading about 10 minutes, or until the dough has become satiny, smooth, and very elastic. It will feel alive under your hands. Do not shortcut this step. Wrap the dough in plastic wrap, and let it relax at room temperature 30 minutes to 3 hours.

Stretching and Thinning:
If using an extra-long rolling pin work with half the dough at a time. With a regular-length rolling pin, roll out a quarter of the dough at a time and keep the rest of the dough wrapped. Lightly sprinkle a large work surface with flour. The idea is to stretch the dough rather than press down and push it. Shape it into a ball and begin rolling out to form a circle, frequently turning the disc of dough a quarter turn. As it thins outs, start rolling the disc back on the pin a quarter of the way toward the center and stretching it gently sideways by running the palms of your hands over the rolled-up dough from the center of the pin outward. Unroll, turn the disc a quarter turn, and repeat. Do twice more.

Stretch and even out the center of the disc by rolling the dough a quarter of the way back on the pin. Then gently push the rolling pin away from you with one hand while holding the sheet in place on the work surface with the other hand. Repeat three more times, turning the dough a quarter turn each time.

Repeat the two processes as the disc becomes larger and thinner. The goal is a sheet of even thickness. For lasagne, the sheet should be so thin that you can clearly see your hand through it and see colors. Cut into rectangles about 4 by 8 inches (10 x 20 cm). Note: Enza says that transparency is a crucial element of lasagne pasta and the dough should be rolled as thinly as possible. She says this is why her housekeeper has such strong arms!

Dry the pasta at room temperature and store in a sealed container or bag.

#2 Bechamel

Preparation Time: 15 minutes

4 tablespoons (2 ounces/60g) unsalted butter
4 tablespoons (2 ounces/60g) all purpose unbleached (plain) flour, organic stone ground preferred
2&2/3 cups (approx 570ml) milk
Salt and freshly ground pepper to taste
Freshly grated nutmeg to taste

Using a medium-sized saucepan, melt the butter over low to medium heat. Sift over the flour, whisk until smooth, and then stir (without stopping) for about 3 minutes. Whisk in the milk a little at a time and keep the mixture smooth. Bring to a slow simmer, and stir 3 to 4 minutes, or until the sauce thickens. Cook, stirring, for about 5 minutes, until the sauce thickens. Season with salt, pepper, and a hint of nutmeg.

#3 Country Style Ragu’ (Ragu alla Contadina)

Preparation Time: Ingredient Preparation Time 30 minutes and Cooking time 2 hours

Makes enough sauce for 1 recipe fresh pasta or 1 pound/450g dried pasta)

3 tablespoons extra virgin olive oil (45 ml)
2 ounces/60g pancetta, finely chopped
1 medium onion, minced
1 medium stalk celery with leaves, minced
1 small carrot, minced
4 ounces/125g boneless veal shoulder or round
4 ounces/125g pork loin, trimmed of fat, or 4 ounces/125g mild Italian sausage (made without fennel)
8 ounces/250g beef skirt steak, hanging tender, or boneless chuck blade or chuck center cut (in order of preference)
1 ounce/30g thinly sliced Prosciutto di Parma
2/3 cup (5 ounces/160ml) dry red wine
1 &1/2 cups (12 ounces/375ml) chicken or beef stock (homemade if possible)
2 cups (16 ounces/500ml) milk
3 canned plum tomatoes, drained
Salt and freshly ground black pepper to taste

Working Ahead:
The ragu can be made 3 days ahead. Cover and refrigerate. It also freezes well for up to 1 month. Skim the fat from the ragu’ before using it.

Browning the Ragu Base:
Heat the olive oil in a 12 inch (30cm) skillet (frying pan) over medium-high heat. Have a large saucepan handy to use once browning is complete. Add the pancetta and minced vegetables and sauté, stirring frequently with a wooden spoon, 10 minutes, or until the onions barely begin to color. Coarsely grind all the meats together, including the prosciutto, in a food processor or meat grinder. Stir into the pan and slowly brown over medium heat. First the meats will give off a liquid and turn dull gray but, as the liquid evaporates, browning will begin. Stir often, scooping under the meats with the wooden spatula. Protect the brown glaze forming on the bottom of the pan by turning the heat down. Cook 15 minutes, or until the meats are a deep brown. Turn the contents of the skillet into a strainer and shake out the fat. Turn them into the saucepan and set over medium heat.

Reducing and Simmering: Add the wine to the skillet, lowering the heat so the sauce bubbles quietly. Stir occasionally until the wine has reduced by half, about 3 minutes. Scrape up the brown glaze as the wine bubbles. Then pour the reduced wine into the saucepan and set the skillet aside.

Stir ½ cup stock into the saucepan and let it bubble slowly, 10 minutes, or until totally evaporated. Repeat with another ½ cup stock. Stir in the last 1/2 cup stock along with the milk. Adjust heat so the liquid bubbles very slowly. Partially cover the pot, and cook 1 hour. Stir frequently to check for sticking.

Add the tomatoes, crushing them as they go into the pot. Cook uncovered, at a very slow bubble for another 45 minutes, or until the sauce resembles a thick, meaty stew. Season with salt and pepper.

***Dinner and a Movie Reminder***

dinner_movie

I also want to remind you that this month's Dinner and a Movie day is tomorrow, March 28. This month's movie is Moonstruck, which should provide lots of inspiration. If you'd like to participate, you can find the details here or here. I hope that you'll join us!

Chermoonstruck

Thursday, March 26, 2009

See What See's Has Hatched for Easter and Toffee-ette Tortoni

toffeeette-tortoni3

Last December, in a mad dash to beat the Christmas Rush, I stumbled upon an interesting new kiosk in one of our local malls. The kiosk was filled products from a company called See's Candies.

See's Candies???

Ahem......It goes without saying that I had to stop and investigate. Here's what I found out.

See's Candies is a manufacturer and distributor of candy, primarily chocolate, in the western United States. It was founded by Charles See and his mother Mary See in Los Angeles, California, in 1921. The company is now headquartered in South San Francisco, California. See's Candies is famous for its delicious and diverse roster of products, which it largely markets only in its own stores, as well as in kiosks at malls and other shopping centers in select markets around the country and abroad.

The friendly See's ladies in their signature black and white uniforms were very helpful and were nice enough to let me try out a few samples while I was there. Thanks to them, I also learned that See's produces some pretty freakin' awesome chocolate! Of course, I left that day with a shopping bag full of little chocolate somethings for everyone on my list.

toffee-ettes

I hot-footed it back to the mall after the Holidays to stock up on some more of See's delicious chocolate, especially my new best friend: Toffee-ettes. Toffee-ettes are irresistible bite-size pieces of rich butter toffee with almonds, which are smothered in See's creamy milk chocolate and then covered with bits of toasted almonds. They are To. Die. For. Alas, when I got to the mall, the kiosk was gone. And, so was all of the chocolate. I was majorly bummed!

toffeeette-tortoni5

Imagine my delight when, a few weeks ago, I received an email from a rep at See's asking me if I was interested in sampling some of their chocolate, and perhaps using it in a recipe. Do I even need to tell you what my response was?

OMG, YES!!! PLEASE, PLEASE, PLEASE, SEND CHOCOLATE!!! YEEEESSSSSSS!!!!

And, they did.

A few days ago, a box of my beloved Toffee-ettes was delivered to me, me, me! After I safely hid them in the back of my pantry behind the pickled beets, I sat down to figure out a recipe to use them in.

toffeeette-tortoni4

At first, I thought of a toffee ice cream. But, my friend, Chocolatechic, had already beaten me to it with a lovely Victoria Toffee Salted Butter Caramel Ice Cream. I also remembered that I had made my own version of toffee ice cream several months ago. So, as much as I love ice cream, I decided to go another way. I still wanted to make a frozen dessert, so I adapted my Tortoni recipe and made Toffee-ette Tortoni. What a great idea THAT was!

My Toffee-ette Tortoni was scrumdiddleyumptious! It was creamy and crunchy and chocolatey and almondy all at the same time. And, it is a snap to whip up. Aside from the freezing, it took me less than 20 minutes to make them. You have really got to try these!

toffeeette-tortoni2

Toffee-ette Tortoni
(Printable Recipe)

Ingredients:

2 tablespoons butter
1 cup sliced almonds
2 tablespoons sugar
1 1/2 cups Toffee-ettes
1 cup heavy cream, chilled
2 teaspoons almond extract
1 quart homemade or premium quality vanilla ice cream, softened
Maraschino cherries, drained and halved for garnish

Directions:

Melt butter in a small skillet over medium heat. Add the almonds and sugar and saute until almonds are lightly browned and caramelized, about 5 minutes. Set aside to cool. When cooled, break almond mixture up into small bits.

Crush the Toffee-ettes into small nuggets. You can do this by putting them in a zip lock bag and smacking them with a rolling pin or meat mallet. Be careful not to turn them into crumbs. Place the crumbled candy in a bowl and toss with the cooled almonds. Set aside.

In a large bowl, whip cream with an electric mixer until stiff peaks form. Spoon the candy mixture into the whipped cream, reserving 3/4 cup or so for topping.

Add the almond extract to the softened ice cream and stir until blended and very smooth. Fold candy/whipped cream mixture into ice cream.

Spoon into little pastry cups or ramekins. Sprinkle each cup with some of the reserved candy mixture and top with a cherry. Freeze until firm.

Makes about 1 quart of Tortoni mixture.

Enjoy!

The folks at See's also asked me if I would let you all know about their recently released line of Easter candies. With the promise of free Toffee-ettes, how could I refuse? Check out their complete selection of Easter candy for yourself. They have everything from jelly beans to chocolate bunnies and then some. I'm particularly partial to their Scotchmallow Eggs, a combination of smooth caramel and fluffy honey marshmallow, covered with rich dark chocolate.

1208_913smallowbig

(Don't they look great?)

Or, how about these fresh, fruity Springtime Truffles, which are raspberry and lemon truffles covered in creamy white chocolate, and topped with delicate pastel flowers. Mmmmm!

springtime-truffles

These Hollow Eggs with Novelty are hollow milk chocolate eggs with an adorable little white chocolate chick hidden inside. How cute are they?

Novelty-Eggs

If you're looking for some fun and fabulous treats this Easter season, look no further than See's Candies. You won't be disappointed. Would I ever steer you wrong?

Monday, March 23, 2009

Rest in Peace, Sweet Maria

rose_1_bg_030703

Oh Dear Readers, you have no idea how much I hate writing posts like this. Yet, I find myself doing it way too often. My heart is heavy today and it probably will be for a long time. And I hope that, if you'll allow me the indulgence of getting it off my chest, I might be able to make some sense of it.

You see, I lost a dear friend on Saturday. Another bright and vibrant young life devoured by cancer. Many of you may remember last May, when I year told you about our legal assistant and good friend, Maria's cancer diagnosis. Doctors found that she had a precariously positioned tumor in her neck, wrapped around her jugular vein. Conventional surgery wasn't an option.

The next ten months were a harrowing and painful journey for her. There was chemo and radiation, and more chemo and more radiation. There were two CyberKnife procedures, a highly sophisticated robotic radiosurgery system used to attempt to reduce or eliminate certain lesions and tumors in the body that are otherwise considered inoperable. The tumor had crushed Maria's vocal cords, so there was reconstructive surgery and speech therapy as well.

The second CyberKnife procedure was considered to be very successful. Finally, there was a small sliver of light at the end of a dark and miserable tunnel. Things were starting to look up for Maria. Then, the unthinkable happened.

Two weeks ago, Maria began having a lot more pain than usual. She was also having trouble with her vision. After undergoing some tests, her doctors told her that there was now a large tumor on her brain. They also said that they thought they could get it all. She was immediately scheduled for more surgery. But, by the time they got in there, that f*%#ing devil cancer had already taken over. There was nothing more they could do, except send her home to wait.

n1025681765_30118293_1044

Maria died early Saturday morning. She was only forty-one years old. She was gentle and kind and warm and smart and funny. She was incredibly beautiful, inside and out. She was an angel among us.

Rest in peace, sweet Maria. Thank God, your suffering is finally over. We love you and will miss you more than you'll ever know.

Rest-in-Peace

Friday, March 20, 2009

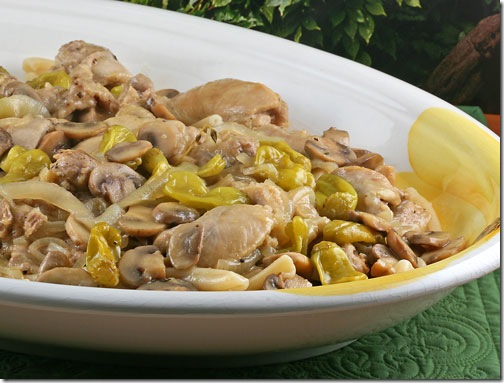
Chicken Pepperoncini for Bloggeraid

Bloggeraid1

About six months ago, a very industrious and passionate trio of bloggers organized an international consortium of even more bloggers and Bloggeraid was born. According to founders, Ivy from Kopiaste, Val from More Than Burnt Toast and Giz of Equal Opportunity Kitchen, Bloggeraid is "a growing group of international food bloggers determined to make a difference in aid of world famine. The love of food and community that brings us together drives the compassion of its members to reach out to our world to help those less fortunate than we are. Banded by a mission of helping to make a change in a world where starvation affects such a profound number of people, we will raise money and awareness for the hungry in communities both at home and abroad."

Pretty amazing, huh? Did I not tell you that these three ladies were industrious and passionate? Back in January, Ivy, Val and Giz announced that Bloggeraid will be publishing a cookbook with 100% of the profit from sales being directed to the School Meals program of The World Food Programme (WFP), the United Nations frontline agency.

BloggerAidSecondEventLogo2small

Why School Meals? Well, in countries where school attendance is low, the promise of at least one nutritious meal each day boosts enrollment and promotes regular attendance. Parents are motivated to send their children to school instead of keeping them at home to work or care for siblings. In the poorest parts of the world, a school meals program can double primary school enrollment in one year. Among the key beneficiaries are girls, who otherwise may never be given the opportunity to learn.

The WFP School Meals program primarily involves providing nutritious in-school meals. However, in its "take-home ration" projects, WFP also provides basic food items, often including a sack of rice and a can of cooking oil, to families who send their daughters to school.

The Bloggeraid cookbook is targeted for sale on Amazon by November/December 2009, and all bloggers have been invited to contribute their favorite recipes to this effort.

Bloggeraid4-SGCC

I'm very happy to be a member of Bloggeraid, and even happier that I am able to contribute a recipe for the cause. This Chicken Pepperoncini is one of the first dishes that I learned to prepare after I was married. Both my mother and grandmother used to make it a lot and it has always been very popular with my family.

In case you're wondering what pepperoncini are, they're a small, bright green variety of sweet pepper in the Capsicum annuum family. They are also known as Tuscan peppers, sweet Italian peppers and golden Greek peppers. Pepperoncini are mild, but zesty, with a slight heat to them. They are commonly pickled and sold in jars, which is how I used them in this dish.

514px-Pepperoncini

The recipe is not a complicated one. Sliced onions, garlic and fresh mushrooms are sauteed with chicken. After which, the ingredients are braised in some white wine, chicken broth and pepperoncini juice. Then, the pepperoncini, themselves are added to the mix and simmered a little bit more. The original recipe uses a whole cut up chicken, but I always make this dish with boneless chicken thighs. Using boneless chicken cuts down the cooking time quite a bit. Plus, the thighs hold up well to braising without drying out.

This Chicken Pepperoncini is a zesty, hearty and very flavorful main dish. It has elements of sweet, sour, salty and spicy woven through it. The dish is warm and mellow, but leaves a little kick in the back of your throat while going down. Of course, the dish really sings when served over a huge bowl of pasta!

Bloggeraid2-SGCC

If you'd like to have the recipe for my Chicken Pepperoncini, I'm afraid you'll just have to wait for the cookbook. I'm such a tease! But seriously, all of the recipe contributors have been asked not to publish their recipes before the book launch.

If YOU would also like to contribute to this wonderful and worthwhile cause, there's still time. The deadline for recipe submission is not until March 31, 2009. Hop on over to this page on the Bloggeraid web site and find out all of the details.

Tuesday, March 17, 2009

TWD: French Yogurt Cake and an Irish Blessing

French-yogurt-cake1

Well, here we are on St. Patrick's Day and I'm posting about a French Yogurt Cake. Funny, huh? But today is TWD day, and this week's recipe is Dorie's French Yogurt Cake with Marmalade Glaze. I'm not complaining, though, because I liked Dorie's cake way better than I like Irish Soda Bread. Not that I dislike Irish Soda Bread, mind you. I just like a moist, delicious yogurt cake more.

Dorie says that a yogurt cake is one of the first things a French child learns to bake. I'm not surprised, because it is probably one of the easiest cakes to make. All of the ingredients get mixed into one bowl, poured into one pan, baked and voilà - cake!

French-yogurt-cake3

While the recipe calls for this cake to be baked in a loaf pan, I decided to try mine in a nine-inch round cake pan. It just felt more like a cake to me that way. I also think that round cakes are prettier.

I also decided to flavor my cake with orange zest and orange flower water instead of the recommended lemon and vanilla. This was mostly because I could only find orange marmalade at the market and I didn't have time to make my own lemon marmalade. Besides, I really love the combination or orange and almond, and almond meal is one of the ingredients of this cake.

I'm no stranger to yogurt cakes. I've even made Dorie's yogurt cake before. Not only are they a snap to make, but they are wonderfully moist, light and absolutely lovely in their simplicity. This cake is no exception.

French-yogurt-cake2

Many thanks to Liliana of My Cookbook Addiction for selecting this week's recipe. It was a perfect choice. If you'd like to try Dorie's cake out for yourself, the recipe can be found here. If you'd like to see a whole lot of other French Yogurt Cakes, please stop by the Tuesdays with Dorie blogroll.

Before I sign off today, I'd like to wish you all a very Happy St. Patrick's Day. Whatever your plans are, be well and stay safe.

Slainte Mhath!

Irish-Blessing3

Monday, March 16, 2009

Flavor of the Month: POM Wonderful Pomegranate Chocolate Chunk Ice Cream

pom-icecream-caption

Okay, so I know that I missed doing a Flavor of the Month entry last month. Unfortunately, I was still stuck in that damn ankle cast at the time and I couldn't really get around yet, so I had to skip it. Thank goodness the ankle has healed up nicely and I'm back in business. It will still be a few more months before I can get back out on the tennis court, but at least I'm mobile again!

A few weeks ago, I was contacted by POM Wonderful about sampling their 100% Pomegranate Juice. I'd seen the juice at the supermarket many times, but had never tried it before. So, I gratefully accepted the offer and did a little research.

pom_pomWonderful

It turns out that pomegranate juice is not only a tasty drink, but boasts many health benefits as well. Pomegranate juice is loaded with antioxidants - about three times more than are found in green tea or red wine. Antioxidants help to guard the body against the substances that can cause premature aging, heart disease, Alzheimer’s, cancer, and lots of other diseases or health conditions.

POM guarantees that their product is 100% authentic pomegranate juice with no sugars or other additives. They grow, juice and bottle all of their own fruit. There are no middlemen. And, POM's juice is made exclusively from the Wonderful variety of pomegranates, which is considered to be the best of over one hundred different varieties. Another great thing about POM is that theirs is the only pomegranate juice guaranteed to come exclusively from fruit grown in their own sunny Central California orchards.

Within a week, a case of cute little bottles of pomegranate juice arrived. I drank one chilled over ice and I really liked it. That juice was good stuff! Then, I started thinking about some different ways to use it. Since I was also trying to decide on an ice cream recipe for this month's Flavor of the Month, the two ideas converged and this Pomegranate Chip Ice Cream was conceived.

pom-icecream3

I had never made an ice cream base using just juice as a flavoring ingredient before. I was worried that the ice cream might not set up properly, or that it might be icy. So, I decided to reduce the juice with sugar and turn it into a thick syrup before I added it to my other ingredients. Making a pomegranate syrup is super simple. All you do is mix the juice and sugar with a little lemon juice, bring it to a boil and keep it simmering until it reduces to the thickness you want.

pom-syrup2

Once my POM juice had reduced into a lovely, thick, intensely flavorful syrup, I let it cool to room temperature. Then, I prepared the base for the ice cream using the syrup, cream, milk and cornstarch. Once the ice cream was churned, I stirred in the chocolate chunks and a few tablespoons of pomegranate liqueur. I did this not only for extra flavor, but also to keep the ice cream from getting too hard in the freezer. If you don't have access to this liqueur, you can use another flavored liqueur or plain vodka. You can also leave it out entirely.

The end result was an ice cream that was very creamy and smooth, although the pomegranate flavor was not as pronounced as I thought it would be. It certainly didn't have that sharp tang that the juice had. Perhaps, it would have retained more of its bite if I had made a frozen yogurt instead. I liked it. It just wasn't exactly what I was expecting. The bittersweet of the chocolate chunks played well against the mellow, laid back fruitiness of the ice cream. I think I would consider this ice cream one for the grown ups. It didn't have that "in your face" sweetness that many ice cream flavors have. It was subtle and sophisticated. Perfect with a cup of after dinner espresso.

pom-icecream4

POM Wonderful Pomegranate Chocolate Chunk Ice Cream (Printable Recipe)

Ingredients:

2 cups bottled POM Wonderful Pomegranate Juice
1 cup sugar
2 teaspoons fresh lemon juice
2 cups heavy cream
1 cup whole milk
3 tablespoons cornstarch
1/8 teaspoon salt
2 tablespoons pomegranate liqueur such as PAMA (optional)
3 ounces bittersweet chocolate, chopped into small chunks

Directions:

Combine pomegranate juice, sugar and lemon juice in a small saucepan over medium-high heat. Stir until sugar has completely dissolved. Bring to a boil, reduce heat and simmer over medium heat for 30-40 minutes, or until juice has reduced to about 1 cup. It should be the consistency of syrup.

Remove from heat and allow to cool for at least 30 minutes. Syrup can be stored in an airtight container in the refrigerator for up to two weeks.

Heat the milk in a saucepan over medium heat to warm it up. In a bowl, whisk the cornstarch and cream together until smooth. Add cream mixture to the saucepan and stir. Heat while stirring until mixture begins to boil.

Remove from heat and continue to stir for a few minutes. Pour the mixture into a bowl and let cool for about 5 minutes, stirring frequently to release the steam. Stir in the pomegranate syrup and salt.

Refrigerate for several hours or overnight, until well chilled.

Once chilled, freeze the mixture in your ice cream maker according to the manufacturer's instructions.

When ice cream has finished churning, scoop it into an airtight freezer container. Stir in the liqueur, if using and the chocolate bits. Freeze until desired firmness is reached.

Makes approximately 1 quart.

Enjoy!

Past Flavor of the Month entries:

Toasted Coconut-Sesame Brittle Ice Cream

Here are some other great recipes using Pom Wonderful:

Pomegranate Lamb Tagine with Preserved Meyer Lemons from No Recipes

Pomegranate Glazed Pork Chops from the Adventures of Kitchen Girl

Pomegranate Palmiers from Cakespy

Cornish Game Hens with POM Pomegranate Glaze from Fotocuisine

Pomegranate Lemon Panna Cotta from Use Real Butter

Pomegranate and Blood Orange Sorbet from The Recipe Girl

Friday, March 13, 2009

St. Paddy's Day Dinner Revisited: Glazed Corned Beef and Lots of Bacon

corned-beef1

Whether you just stepped off a boat from Dublin or don't have an ounce or Irish blood in you, you'll most likely be doing some kind of celebrating when St. Patrick's Day rolls around next week. I'm not much into the whole green beer thing, but I must confess that this Italian girl loves a good corned beef and cabbage feast. But, as you probably already know, I can rarely leave a good thing be. So, I've put together a tricked out version of the original for you adventurous souls out there.

It all starts with the slow cooker. I gathered together all of the ingredients for a traditional corned beef and cabbage dinner and prepared it in my crock pot. After that, I separated the components and made three separate dishes with them. My corned beef was baked with a delicious apricot-spicy mustard glaze. With some of the cabbage, onion and potatoes, I made Colcannon augmented by the judicious use of some nice, thick bacon. Then, I used the rest of the cabbage and sauteed it with onion, cider vinegar and yes, MORE BACON!

cabbages3

Just look at these beautiful little cabbages! Aren't they gorgeous? These beauties came out of the last harvest from my Uncle Sal's garden. They were the tenderest, sweetest cabbages I'd ever tasted. Cooking with them was definitely a bittersweet experience, but I think he would have approved of the end result.

cabbage-saute1

The great thing about this dinner is that most of the ingredients are already cooked in the slow cooker once, so preparing the individual dishes hardly takes any time at all. You can even do it all in advance and refrigerate until you're ready to make the individual recipes. Also, you can cook all of the bacon for the Cabbage Saute and the Colcannon at once and divide it for each dish, like I did.

colcannon1

Please don't let the quality of my photographs deter you from trying any of these recipes. In the first place, mashed potatoes and cabbage are not the most photogenic foods around. In the second place, that corned beef turned out so incredibly tender, that it just fell apart as I tried to slice it. In the third place, I had to work reeeeeallllly fast because my hungry natives were getting restless! All three of these dishes were absolutely scrumptious!

corned-beef2

Tricked Out St. Patrick's Day Dinner
(Printable Recipes)

Apricot-Mustard Glazed Corned Beef

Ingredients:

1 large sweet onion, cut into quarters
4 medium potatoes, peeled and quartered
1 1/2 cups low sodium chicken broth
1 1/2 cups water
garlic cloves, minced
1 bay leaf
2 tablespoons sugar
2 tablespoons apple cider vinegar
1 (3 pound) corned beef brisket with spice packet
1 large or 2 small heads of cabbage, cut into wedges

For the Glaze:

1 cup apricot preserves
2 tablespoons brown sugar
2 tablespoons spicy deli mustard
2 tablespoons fresh lemon juice
2 tablespoons kumquat or orange syrup (optional)

Directions:

Place the onion and potatoes in a 5-qt. slow cooker. Combine broth, water, garlic, bay leaf, sugar, vinegar, and contents of spice packet; pour over vegetables. Top with brisket and cabbage. Cover and cook on low for 8-9 hours or until meat and vegetables are tender.

Preheat oven to 350 deg. F.

Carefully remove corned beef from the slow cooker and place in a shallow roasting pan.

Mix all glaze ingredients together in a bowl. Pour over corned beef. Bake 30-40 minutes, until glaze is nice and bubbly.

Remove corned beef to a platter, slice on the diagonal and serve.

Sauteed Cabbage

4-5 slices thick cut bacon
1/2 of the reserved cabbage from slow cooker, sliced into strips
1 large sweet onion, thinly sliced
2 tablespoons cider vinegar
2 tsp sugar
Salt and pepper to taste

Place bacon in a large skillet and cook over medium high heat until evenly browned. Place on a plate lined with paper towels and cut up into small pieces. Set aside.

In about 2 tablespoons of the reserved bacon drippings, (Save the rest for later.), saute the onion until very soft. Add cabbage and the rest of the ingredients and saute until liquid is absorbed and all is heated through.

Serve.

Colcannon

Ingredients:

Reserved potatoes from slow cooker
1/2 of the reserved cabbage, cut into small chunks
4 strips bacon
1 large sweet onion, sliced
1/4 cup half and half
Salt and pepper to taste
2-3 tablespoons butter (preferably Irish)

Directions:

Place potatoes in a large bowl. Smash them up a bit and set aside.

Place bacon in a large, deep skillet. Cook over medium high heat until evenly brown. Drain, reserving drippings, crumble and set aside. In the reserved drippings, saute onion until very soft. Add the cabbage for the last few minutes and continue to saute so that the cabbage absorbs some bacon flavor.

Mix the half and half into the potatoes and season with salt and pepper. Fold in the bacon, cabbage, and onions, then transfer the mixture to a large serving bowl. Make a well in the center, and top with butter.

Serve immediately.

Tuesday, March 10, 2009

TWD: Lemon Cup Custard

custard-cups1

This week's TWD recipe seems to have caused a lot of consternation among my baking colleagues. Many of them lamented that Dorie's Lemon Cup Custard was just too "eggy". I kind of don't get that, because this recipe is for an egg custard, which by its very definition should tip you off that it is eggy. Some were disappointed that this custard wasn't more like a creme brulee or even a flan. But, it isn't a creme brulee or a flan. It is an egg custard, and, I thought it was a very nice one too. Now, I've had many egg custards over the years that were not so nice. Instead of having a lovely light and silky texture, like this one, they were slippery and slimy, sliding right off of my spoon before ever reaching my mouth. Dorie's custard wasn't like that - at least not for me.

custard-cups2

The recipe for these custard cups is super easy. Milk is heated and allowed to steep with fresh lemon zest. The milk is then strained and whisked into some eggs beaten with sugar, after which it is baked in a water bath. That's it. Couldn't be simpler! No Kitchenaid mixer. No gobs of butter. No breaking out every bowl in your kitchen. No huge mess to clean up. For these reasons alone, I loved this dessert!

lemonzest1

I did tweak this recipe a little bit after reading what some of the other TWDers had to say. I used half and half instead of milk, which I'm sure contributed to the extra richness and firmness of my custard. I also infused half of the liquid with some fresh ginger, because I think lemon and ginger make a nice combination. I did add a few drops of lemon oil to the custard mixture too, as suggested by Dorie, which to be honest, didn't really add a whole lot of extra lemon flavor. I topped my lemon-ginger custards with crystallized ginger, and my plain lemon custards with some candied kumquats that I had made with kumquats from my tree.

custard-cups3

As I mentioned above, these custard cups were light and silky smooth. The lemon factor was very subtle. Using only the zest and none of the lemon juice eliminated any tartness. I thought that they were perfect for what they were meant to be - a simple and elegant little dessert.

Many thanks to Bridget from The Way the Cookie Crumbles for choosing this recipe for us this week. It was a welcome change from all of the rich, heavy, labor-intensive stuff we've been making. If you'd like to try this one at home, Bridget has the recipe posted here. And, as always, you can see lots more Lemon Cup Custards on the Tuesdays with Dorie blogroll.

custard-cups4

Sunday, March 8, 2009

Chewy, Gooey Chocolate Chip Cookies (to Ease the Pain)

chewy-chocochip1

And, the circle continues....For those of us who live in North America, today marks the beginning of another round of Daylight Saving Time. Every spring we move our clocks one hour ahead and "lose" an hour during the night and each fall we move our clocks back one hour and "gain" an extra hour. Except, it isn't even #%*&@!*% Spring yet! But, here we are, barely into March, and we've already lost that precious hour of sleep. Another lovely gift from the Bush administration!

Originally the brainchild of none other than Benjamin Franklin, the main purpose of Daylight Saving Time (called "Summer Time" in many places in the world) is to make better use of daylight. The rationale for this theory was that energy use and the demand for electricity for lighting homes is directly related to the times when people go to bed at night and rise in the morning. In the average home, 25 percent of electricity is used for lighting and small appliances, such as TVs, computers and stereos. A good percentage of energy consumed by lighting and appliances occurred in the evening when families were home. By moving the clock ahead one hour, the amount of electricity consumed each day decreased. Plus, the extra daylight hours allowed many to indulge more in outdoor activities. When people are not at home, they don't turn on the appliances and lights.

chewy-chocochip3

Daylight Saving Time was originally instituted in the United States during World War I in order to save energy for war production by taking advantage of the later hours of daylight between April and October. During World War II the federal government again required the states to observe the time change. Between the wars and after World War II, states and communities chose whether or not to observe Daylight Saving Time. In 1966, Congress passed the Uniform Time Act which standardized the length of Daylight Saving Time. Thanks to the passage of the Energy Policy Act in 2005, Daylight Saving Time was extended by four weeks from the second Sunday of March to the first Sunday of November. To me, that translates into a thirty hour sleep deficit, which I am never happy about!

However, there is quite a lot of controversy as to whether DST actually does conserve a significant enough amount of energy to justify the disruption in our lives. There is also evidence to show that DST can actually be a harmful thing. Here is an interesting article in U.S. News & World Report about this.

ist2_4114538_curly_haired_woman_wearing_pajamas

(Not a pretty sight, huh?)

Whichever side of the fence you may sit on regarding this issue, let me just say that in my opinion, Daylight Saving Time SUCKS! It is going to be sheer torture for my family and I to get up at 6:00 a.m. tomorrow, knowing it is really only 5:00 a.m.! The fact that we will have to do this for an extra four weeks each year sucks even more!

Another issue fraught with controversy is the great chocolate chip cookie debate. If you asked one hundred people to name their idea of the perfect chocolate chip cookie, you'd probably get one hundred different answers. Chewy, crispy or cakey. Milk chocolate or dark. Nuts or no nuts. Ever since Ruth Wakefield accidentally invented the chocolate chip cookie, there have been literally thousands of different incarnations of them, all in the quest for the "perfect" cookie. Several food bloggers have entered the debate. Even the New York Times has weighed in on the subject.

chewy-chocochip2

For me, the Holy Grail of chocolate chip cookies is one that strikes that perfect balance between crispy and chewy. You know what I mean. The one with the crunchy, crackly perimeter that kind of shatters when you bite into it, hinting of butter and caramel, and giving way to a ooey, gooey chocolaty center. The apparent key to this ultimate combination is the resting and chilling of the cookie dough from anywhere to a few hours to a few days.

One of my favorite chocolate chip cookie recipes is one I have adapted from Alton Brown. For my money, his "chewy" version is pretty close to "as good as it gets". Alton uses melted butter and bread flour in this recipe. I found this a little unusual, but it works. I chill the dough anywhere from a few hours to overnight and I'm always rewarded with incredible sticky, gooey, creamy and chewy cookies. I always add toasted, chopped pecans to them. Sometimes, I put some toasted coconut in them too as I did here.

chewy-chocochip4

The Chewy isn't the only chocolate chip cookie recipe that I like. I'm also very fond of David Lebovitz's version from The Great Book of Chocolate. The only quibble I have with that one is that my cookies always tend to turn out really flat. I'm not sure why that is, but it is. I haven't tried the New York Times recipe yet, although I'm sure that, at some point, I will.

Anyway, If you're as bummed out about the reappearance of Daylight Saving Time as I am, make some of these cookies. You'll still be just as tired in the morning, but at least you'll have something wonderful to look forward to. I promise, they will help to ease the pain!

The Chewy (My Way)
adapted from Alton Brown on The Food Network
(Printable Recipe)

Ingredients:

2 sticks unsalted butter
2 1/4 cups bread flour
1 teaspoon kosher salt
1 teaspoon baking soda
1/4 cup sugar
1 1/4 cups brown sugar
1 egg
1 egg yolk
2 tablespoons milk
2 teaspoons vanilla extract
2 cups good quality semisweet chocolate chunks or chips
1 cup chopped pecans, toasted
1 cup flaked coconut, toasted

Directions:

Heat oven to 375 degrees F.

Melt the butter in a medium saucepan over low heat or in the microwave. Sift together the flour, salt, and baking soda and set aside.

Pour the melted butter in a mixing bowl. Add the sugar and brown sugar. Cream the butter and sugars on medium speed. Add the egg, yolk, milk and vanilla extract and mix until well combined. Slowly add the flour mixture and mix on low speed until combined. Stir in the chocolate chips, pecans and coconut.

Chill the dough for at least 2 hours or overnight.

Using a medium ice cream scoop, scoop dough onto parchment-lined baking sheets, approximately 6 cookies per sheet. Bake for 14-16 minutes or until golden brown. Rotate the baking sheet halfway through for even browning. Cool completely and store in an airtight container.

Thursday, March 5, 2009

March Dinner and a Movie: Moonstruck and Festa Italiana

Chermoonstruck

Hey, fellow movie fans! Are you ready for another installment of Dinner and a Movie? Hope so, because this month I get to choose! And, I've picked one of my all time favorite films: Moonstruck!

Moonstruck is a delightful and endearing romantic comedy about love and life set in New York City's Italian-American community. Although the film dates back to 1987, it's charm is timeless. In it, Loretta Castorini, an unlucky in love Italian widow (her first husband was hit by a bus) finds romance through the intervention of a big, beautiful and very full moon. With her second wedding just weeks away, she meets and reluctantly falls hopelessly in love with her fiance's estranged younger brother! Her dilemma and her hilariously eccentric family make for an unforgettably enchanting and irresistible movie experience.

I selected Moonstruck as this month's movie for several reasons. First of all, I love, love, love it! Secondly, I felt that the decidedly ethnic flavor and various subplots of the film would give you all lots to work with when deciding what your dishes would be. Thirdly, did I mention that I love this movie?

dinner_movie

Anyway, if you want to play along this month with my co-host, Marc (No Recipes) and me, check out Marc's Dinner and a Movie page. You'll find all of the event guidelines there, including how and where to send your entries.

The post deadline for this month's installment of Dinner and a Movie, featuring Moonstruck, will be on Saturday, March 28. I will be posting the roundup here at SGCC shortly thereafter. Our live Twitter movie event will be the week before, on Saturday March 21, at 9PM EST. Just log on to Twitter, pop the movie in your DVR, grab some popcorn and watch the movie along with us, tweeting along the way!

I'm really looking forward to this one. I can't wait to see what you all come up with this month!

festa1

Now, because I'm so incredibly efficient (NOT!), and because I just wouldn't feel right about sending you off empty-handed, I'm leaving you with some delicious Spaghetti and Meatballs to tide you over.

minimeatballs1

This Spaghetti and Meatballs is going over to Maryann from Finding La Dolce Vita and Marie from Proud Italian Cook for their second annual Festa Italiana event. Come and join them at their festive tables under the shade of twisting grapevines, as they eat, drink, laugh, dance and sing the time away. They have already started posting the roundups here and here, so what are you waiting for!?!?

spaghetti-meatballs2

SCGG's Spaghetti and Meatballs
(Printable Recipe)

1 lb cooked spaghetti

For the meatballs:

1 lb. ground chuck
1/2 lb ground veal
1/2 lb ground pork
2 cloves finely minced garlic
1 medium sweet onion, coarsely grated
1/2 cup flat leaf parsley, finely chopped
1 cup panko crumbs soaked in 1/4 cup milk
1/2 cup grated parmesan cheese
2 eggs, beaten
1/2 tsp salt

For the sauce:

3-4 tbs olive oil
1 large onion, diced
2-3 cloves garlic, minced
1 cup shredded carrot
1/4 cup fresh basil leaves, loosely packed
1 tbs fresh thyme leaves
4 28 oz cans peeled, whole tomatoes (preferably San Marzano) or the same amount of crushed tomatoes
1/2 cup white wine
3 tbs tomato paste
1 batch baked meatballs
1/2-1 tsp red pepper flakes to taste
Salt and ground black pepper to taste
1/4 cup chopped fresh basil for garnish
Parmesan or Romano cheese, grated for topping

Directions:

Preheat oven to 350 degrees.

Mix all of the meatball ingredients in a large bowl until combined. Do not overhandle or the meatballs will be tough. The mixture should be moist, but hold together. If the mixture appears too wet, add more panko crumbs, a little at a time. If it is too dry, add a little more milk.

Form into balls, about 1-1 1/2 inches in diameter. You should get about 20 meatballs out of this recipe.

Place meatballs on a shallow baking sheet and bake until they start to brown, about 15 minutes. Remove from the oven and set aside.

In the meantime, begin making your sauce. Put whole tomatoes into a large bowl. With your (clean) hands, squish and mush them until they are all broken up. If you're using crushed tomatoes, skip this step. Set aside.

In a large stock pot or Dutch oven, heat the olive oil on medium high heat. When the oil is hot, reduce heat to medium and add the onion, carrots and thyme. Saute about 8-10 minutes or until onion is soft and translucent. Add the garlic and saute a few minutes more, until it becomes fragrant. Be careful not to burn it.

Add the wine and whisk in the tomato paste. Let it bubble up and cook down for a minute or two.

Add the tomatoes to the pot and stir, mixing everything together.

Add the red pepper flakes and 1/4 cup of the basil. I usually like to add a little salt and pepper at this point as well.

Stir again, cover the pot and wait for the sauce to begin to bubble. Reduce heat to medium low and keep sauce at a simmer.

Carefully, lower the meatballs into the sauce. Don't stir at this point because you don't want to break up the meatballs. Cover and gently simmer for about 30 minutes. Then, uncover, gently stir and let the sauce simmer for about 30 minutes more. If, for some reason, your sauce starts to burn or stick a little on the bottom of the pot, do not scrape it with your spoon or else the whole sauce will taste burned!

Add additional salt and pepper to taste.

Remove meatballs to a large bowl or platter and keep warm. Place the pasta on a large serving platter and ladle the sauce on top. Toss well. Serve the meatballs separately or on top of the spaghetti. Top it off with the rest of the fresh basil and grated cheese.

Serve and enjoy!

Here are some other great pasta dishes from the SGCC archives:

Easy Peasy Meatball Ziti

Pasta e Fagioli

Pasta Pissaladierre

Spaghetti fra Diavolo con Vongole

Spaghetti all' Amatriciana

Tuesday, March 3, 2009

When Life Gives You These......

bell-peppers

You really just HAVE to make these......

stuffed-peppers5

I saw these stunning red bell peppers at the market the other day, and they stopped me in my tracks. Not only were they gorgeous, but they were HUGE and perfectly shaped! The minute I laid eyes on them, I knew that being stuffed and baked was their destiny.

I hadn't made stuffed peppers in eons, and frankly, I wasn't sure I even remembered how. But, after a quick phone call to Mom, and a little surfing around on Food Blog Search, I knew just what to do.

I decided to start with a basic stuffed pepper recipe, using a combination of ground beef, veal and pork mixed with rice for my filling. I used a short grain Valencia rice because I already had an opened package in my pantry, but you can use any kind of rice you'd like. After the peppers were stuffed, they were baked in a bath of tomato sauce. For a bit of a Greek flair, I added some cinnamon to both the filling and the accompanying tomato sauce. For a little oomph, I added some smoked paprika to both as well.

And the tomato sauce! I must tell you about that sauce. I did something with it that I have never done before. In addition to the regular cast of characters, plus the cinnamon and smoked paprika, I also whisked in a can of tomato soup. Yes, you heard me, TOMATO SOUP! Why, you ask? Well, first of all, I wanted to cut the acidity of the tomatoes. Secondly, I also wanted the sauce to have a touch of sweetness, which I thought would complement the cinnamon. Thirdly, I'm just crazy like that sometimes.

stuffed-peppers4

Did it work? A resounding YES! This tomato sauce was so velvety, that it was almost creamy. It had a warm, mellow, slightly spicy/sweet flavor that kept improving the longer it simmered. In fact, I made some meatballs out of the leftover filling and simmered them in the leftover sauce the next day. I served them over some plain, boiled potatoes and I swear, people, magic happened!

These stuffed peppers are definitely something best saved for a lazy weekend day. To do them right, you've got to take your time. But, it is oh, so worth it! You also have to judge exactly how long to bake them. The time will vary depending upon the size of your peppers. As I said, mine were very large, so I did have to add a good thirty minutes to the baking time. If you use smaller peppers, you probably won't need that much time.

I served the stuffed peppers with a green salad, tossed very simply with some olive oil and vinegar, and a loaf of very crusty French bread. That's all you need. This dish is extremely hearty, satisfying and filling. All of us here at Chez SGCC adored it! In fact, I think I noticed Mr. SGCC's eyes roll back in his head a little as he took his fist bite.

stuffed-peppers3

Now, I know it's Tuesday, and Tuesday is TWD day, but this week's recipe was Dorie's Chocolate Armagnac Cake, chocolate being the operative word here. It is basically another dense, rich, flourless chocolate cake made with prunes and brandy. I'll be honest with you, people. After all of the chocolate that has passed through my kitchen in the past week, I couldn't bear the thought (or expense) of making One. More. Chocolate. Dessert. Even I have my limits! In the past seven days, I have made chocolate covered Caramel Crunch Bars, a flourless Chocolate Valentino Cake and not one, but TWO kinds of chocolate truffles. I've gone through three pounds of Guittard and Valrhona chocolate, pounds of butter and countless eggs. Melted chocolate has adorned my cabinets, countertops, walls and me! By the time I was through, I could have passed for a great big, giant chocolate truffle myself! So, I hope that you'll forgive the transgression, but I just couldn't do chocolate again. If you're in a chocolate mood, please stop by the Tuesdays with Dorie Blogroll to see lots of Chocolate Armagnac Cakes. If you'd like the recipe, you can find it at Lyb's site, And Then I Do the Dishes.

Stuffed Peppers alla SGCC
(Printable Recipe)

Ingredients:

6 large red or yellow bell peppers
1 large onion, diced
3 cloves minced garlic
2-3 tbs olive oil
1/2 lb ground veal
1/2 lb ground pork
1 lb ground beef
2 eggs
1/2 cup minced parsley
1 cup panko crumbs
1 cup short grain rice
1/2 tsp smoked paprika, or more to taste
1/2 tsp cinnamon, or more to taste
1 tsp salt
1/4 tsp black pepper
4 cups tomato sauce (recipe follows)

Directions:

Preheat oven to 375 deg. F.

Wash, dry and then cut the tops off of the peppers. Hollow out the peppers, removing all ribs and seeds. Set aside.

Heat a large skillet over medium-high heat. Pour in the olive oil and add the onions. Lower heat to medium and saute for about 10 minutes, until the onions are soft and translucent. Add garlic and saute a minute or two more. Set aside to cool.

In a large mixing bowl, add all ingredients, except tomato sauce, and mix well.

Using a spoon or scoop, stuff the peppers with the filling. Save the tops for later. Place the stuffed peppers in a roasting pan or large casserole dish and top with tomato sauce. Cover tightly with aluminum foil and bake for approximately 1 hour. Then, remove the foil and put the tops on the peppers. Bake 20-30 minutes more, until peppers begin to get browned and the sauce is nice and bubbly.

Serve.

Tomato Sauce

Ingredients:

2-3 tbs olive oil
1 large sweet onion, diced
1 clove minced garlic
2 tsp fresh thyme leaves
1 tbs fresh oregano leaves
1 28 oz can crushed tomatoes
1 can tomato soup
1 cup water
1 cinnamon stick
1/2-1 tsp smoked paprika to taste
Salt and pepper to taste

Directions:

Heat a medium saucepan over medium-high heat and add olive oil. Add onions and saute for about 10 minutes, until the onions are soft and translucent. Add garlic, thyme and oregano, and saute a minute or two more.

Add crushed tomatoes, soup and water and mix well to combine. Stir in cinnamon stick and smoked paprika. Bring to a boil, then lower heat so that sauce is gently simmering. Simmer, covered for about 20-25 minutes. Uncover and simmer another 15-20 minutes, until sauce starts to thicken.

Remove cinnamon stick, and add salt and pepper to taste.

Enjoy!